How To Keep Your Project Secure When Hiring a New Remote Developer
As someone who has hired probably around 50 developers, I’d like to think that I have a good handle on the do’s and dont’s. Sometimes things go great and sometimes they don’t. There is a mountain of advice I could give like hire slow and fire fast or good communication is just as important as technical skill, etc. This post is more technical and for the people who are nervous about bringing someone onto an existing project.
For this post to make sense I am assuming that you know how to use Git or some other version control system.

My first piece of advice: Do not worry. Almost nobody is interested in stealing your precious project.
Have a contract. The cost of actually pursuing a broken contract against a person overseas is almost always greater than the benefit but sometimes it will make your RD (remote developer) think twice about their actions. Same with a NDA. Almost always not worth the headache unless they live in the same country as you.
Remove all secrets and hardcoded links. Anything that you need should be changed to an environment variable.
Reset your Git commits or create a new repo (Optional) - I have been guilty of hardcoding things when I start a new project so getting rid of all commits or just moving the project into a new one and starting a new git is an easy fix
Have staging. Ideally you should have a test staging environment and a production environment. RD should not have access to production environment and all their commits and pushes should go to the testing stage. Don’t have a staging environment? At the minimum you should make it so that RD can’t push to production.
Segregate your work if possible. I’ve started to use multiple Github repositories for different aspects of the same project. One for frontend and associated logic and one for backend. This works great for micro-service type architecture. Hiring a frontend RD? Only give them access to the frontend repository.
Define Permissions. You can both set permissions on a repository and on certain branches! Use this to your advantage.
June 15, 2022
How to come up with Good Ideas for a Business
Are you a first time entrepreneur? Never started a project before? Don’t bother reading the rest of this post. Spend 30-60 minutes thinking about something that bothers you and come up with a way to fix it. Congratulations, you came up with your first business. Is it a good business? Who knows. It doesn’t matter because the skills you learn are infinitely more valuable than whatever oyur idea was. whatever your idea was.
Dedicate time: Coming up with good ideas is a skill. It takes time and practice. You should set aside, 1-2 hours, once a month and just think. Have a piece of paper, notepad, whatever in front of you, but no phone or distractions. At the end, copy whatever you have into a journal.
Set the Scope: What kind of idea are you trying to come up with? Are you trying to build passive income, 10k MRR or a billion dollar company? These are the questions you need to be asking yourself. If you are trying to build a billion dollar company then whatever you are thinking of should be 10x better than anything else that exists out there. If you are trying to build a 10k MRR project that is good too, but realize the scope of your idea. It helps to stay motivated when you have realistic expectations. Don’t be one of those people who thinks they are going to be a billionaire off their next online form builder.
Inspiration: Should come from within. It is easy to be excited about an idea, but unless it is solving a daily pain or something you can connect deeply with, than its hard to keep the motivation. Having background knowledge about the domain of the idea is nice, but not a must have. I would argue that sometimes not having domain knowledge is an advantage.
Validation: You can write an entire book on how to validate your ideas. I will definitely have a post or two about how to do that in the future.
May 22, 2022
Update on Predict My Step Score for Step 1
It seems that Step 1 has switched to pass/fail and NBME practice tests give out a percentage that tells you whether you are going to pass or not. With these changes I feel that there really isn’t much utility to the Step 1 Score Predictor on PMSS. I don’t see why anyone would use the site when the NBME practice test pretty much tells you the same thing?
Feel free to let me know if you think otherwise but I have a feeling I’m just gonna shut down that part of the predictor.
April 27, 2022
My current setup and workflow
I’ve seen posts like these before and thought it would be cool to post my own. Spring Inventory Taking
Health:
- Sleep/HR Tracker: Oura Ring Gen 3 - Pretty accurate sleep tracker. Not a great HR tracker as it only takes HR at certain intervals
- Posture Sensor: Upright Go 2 - Works great as advertised. If you have sensitive skin get the necklace. I suspect after a year of continuous use that you probably won’t need it anymore
- Mouth Tape: Vio2 - Not necessary to sleep but there is an obvious improvement in my sleep when I use these and Oura can recognize it
- Floss: Dr. Tungs Smart Floss - PFAS & PBA free and gets gunk better than normal floss
- Toothpaste: Sensodyne - I have sensitive teeth
Workflow
- Personal Reminders: GoodTask - Worth every penny. Use it every day
- Goal Setting: Mind Node
- Net Worth Tracker: Personal Capital - They call a lot but ui is very simple. Exactly what I need it to be
- Budget & Expense Tracking: Airtable
- Note Taking: Evernote - Stuck on this too much to switch to notion
- Bookmarks: Safari Reading List - Gets the job done
Desktops
- Desktop 1
- CPU: Ryzen 3700x
- CPU Water Block: EK-Supremacy Classic RGB, Nickel/Plexi
- Storage: NVMe.M2 500gb SSD
- Ram: 16gb gskill
- Sound Card: Sound Blaster Audigy Fx
- Motherboard: B450 Tomohawk Max II
- GPU:
- RTX 3090
- EK Waterblock + Backplate
- GTX 2070S
- Keyboard: Coolermaster SK621
- Mouse: Logitech G502 Wireless
- Mousepad: Icemat I-2 (Pink)
- Monitor: 34GK950G-B
- PSU: SeaSonic X-1250XM2 ATX12V 80+ GOLD Certified Full Modular
- Case: Phanteks Enthoo Primo
- Desktop 2
- CPU: Intel I5-2500K
- GPU:
- MSI GEFORCE GTX 1080 TI ARMOR 11G OC
- GTX 1070
- Storage:
- 1TB hitachi 7200 RPM 32mb Cache
- Samsung SSD 850 EVO
- Ram: Patriot G Series Sector 8 GB (24gb) 2 for 16 GB total
- Motherboard: MSI P67AGD55_B3
- Cannot upgrade bios because the new bios only support ivy bridge and not sandy bridge
- PSU: Corsair 750W (Non-modular)
- Monitor: LG 34UM95C
- Mouse: Logitech G502 Wired
- Keyboard: Satisfaction 75 R2 + Box Navy Switches
- Mousepad: Icemat I-1
Laptops
- Microsoft Surface Pro 6
- Macbook Pro 15 inch 2018 with eGPU setup
- Mouse:
- G502 Wireless (Home)
- G903 Wireless (Traveling)
- Mousepad: Icemat I-2
- Monitor: LG 34GP83A-B
- Webcam: Logitech C922X
- GPU: AMD Radeon 5700 XT
- eGPU Connector: R43SG-TB3
- Keyboard: Rosewill Mechanical Keyboard + MX Blue
Phone
- Iphone - Upgrade about every 3-4 years
April 26, 2022
How I made a bot that scrapes HTML and posts to Twitter using No-Code
Background:I recently finished launching a small webapp that I made for fun. If You Had Invested. It doesn’t do much except tell you potential gains (or losses) you would have had if you held onto a stock/crypto in the past. My inspiration for the project came when I realized I had unhealthy obsession checking stocks with the biggest moves pre-market. I would then see how much you would have made if you had bought them 12 months in the past.
Problem: I wanted to come up with a way to be notified about the stocks with the biggest moves pre-market and see how much money you would have made if you held for the past year via a link to If You Had Invested. Also would be nice if it was posted to social media. Finally, I wanted it to be done without having to build/host my own script and all the programming that comes along with it.
Solution: Enter Zapier, my favourite no code platform.
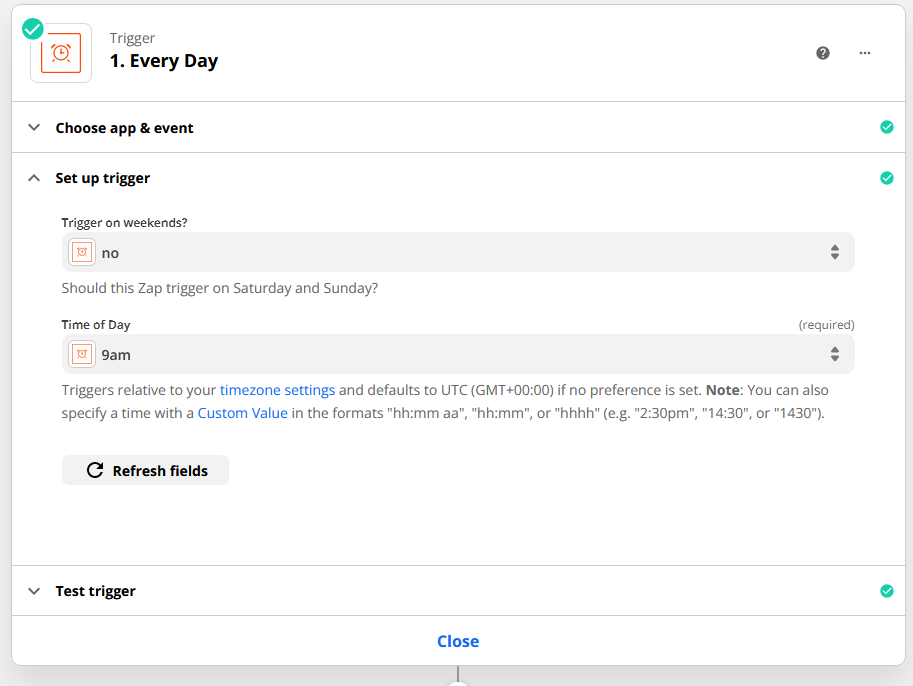
I started off with a trigger zap to run the zap at 9am every weekday.
I then used a Parse webpage zap to go to https://finance.yahoo.com/gainers/ and copy the HTML.
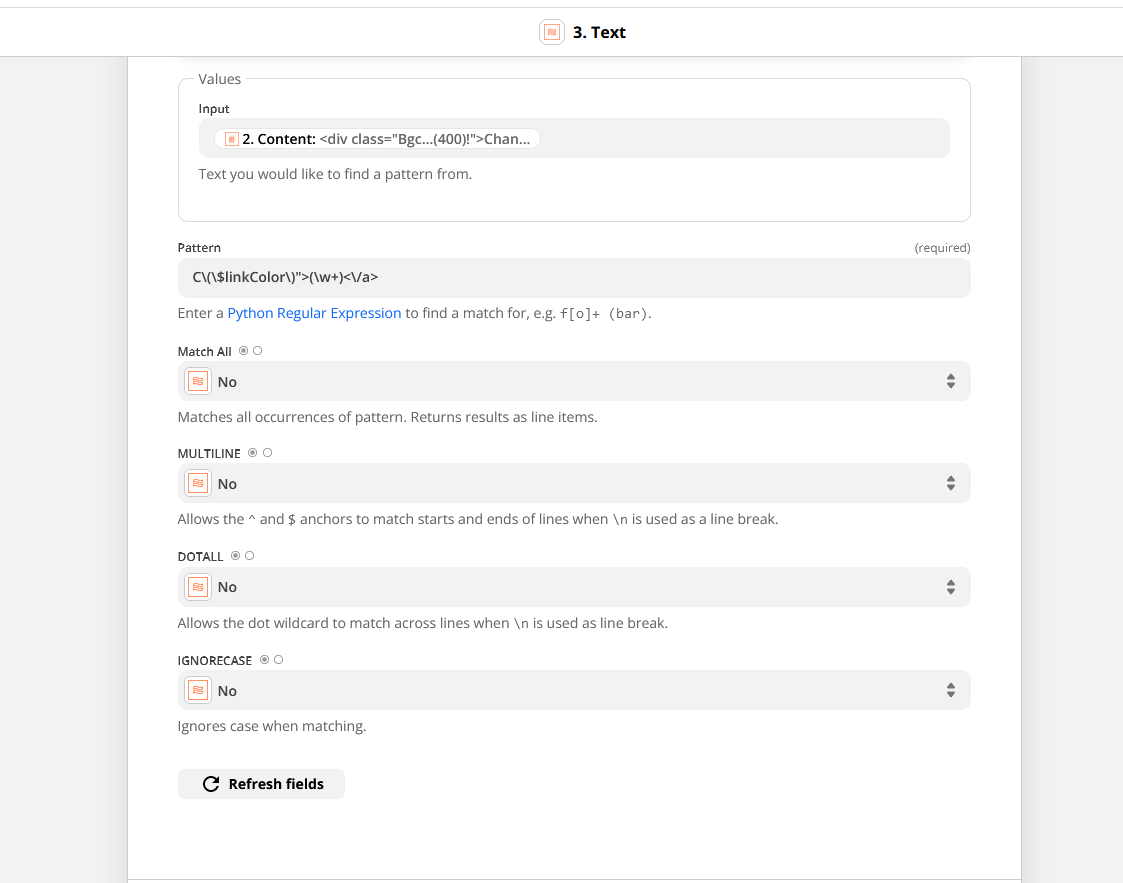
Using the text zap, I took the HTML from the previous zap as the input and Regex to extract the stock symbol I needed.
And then finally using the Twitter zap I could automatically post the link to twitter.
In about 5 minutes I was able to create a solution whereas without no-code it would have taken 5 minutes to just figure out what packages I would need to code this up.
April 9, 2022
Automatically deploy docker containers to a server after you commit to GitHub
After I push to GitHub, I have a GitHub action that automatically creates a docker package. My goal was to create a system that would automatically deploy my docker container after the main branch of my project had been pushed to.
Prerequisites
– Ubuntu Server >=17
– Github
– Docker
– Webhook ( https://github.com/adnanh/webhook )
Things you should have prepared:
– Server IP address
– Project Name
– Github action to automatically create a package when you push to master or however else you define it (https://gist.github.com/ARezaK/ad0697302915f34c53224239d293bc7d)
Setup webhook on github
- Go to your Github project repository -> settings -> webhooks -> add webhook
- Create a new webhook.
- Use the payload URL as your http://:9000/hooks/deploy_project_name
- Click “Let me select individual events” -> Click “Packages” and uncheck everything else
- Click Save
Setup webhook on your server
- Run
sudo apt-get install webhook. I found out using the apt-get method that it already creates a service for me which you can see with systemctl status webhook. You won’t see this on the documentation page of the project repo. Use this command to restart the service sudo systemctl restart webhook if you make changes.
- Using the status command above you can see that the service is using a file called /
etc/webhook.conf That is the equivalent of your hooks.json which you will see mentioned in the project repo.
- I also went to and edited the file
/lib/systemd/system/webhook.service to add the -verbose tag so now it looks like this
 [Unit]

Description=Small server for creating HTTP endpoints (hooks)

Documentation=https://github.com/adnanh/webhook/
[Service]
ExecStart=/usr/bin/webhook -nopanic -hooks /etc/webhook.conf -verbose
 [Install]

WantedBy=multi-user.target
Below is what my webhook.conf looks for my 2 projects. Adjust it to your liking.
 [

{

“id”: “deploy_project_name”,

“execute-command”: “/root/webhoooks/deploy_project_name.sh”,

“command-working-directory”: “/”,

“include-command-output-in-response”: true,

“response-message”: “Deploy Project_name”

},

{

“id”: “deploy_project_name_2”,

“execute-command”: “/root/webhooks/deploy_project_name_2.sh”,

“command-working-directory”: “/”,

“include-command-output-in-response”: true,

“response-message”: “Deploy Project_name_2”

}

]
Go to your root folder and create a folder called webhooks. This is where you will place your bash files
For each one of my projects I have a bash file in the webhooks folder that looks like this
#!bin/bash
docker pull ghcr.io/:main

docker stop

docker system prune -f

docker run –name=“” -d –restart always -e “PORT=8765” -e “DEBUG=1” -p 8012:8765 ghcr.io/:main
with their respective names being deploy_project_name.sh and deploy_project_name_2.sh
Once you have created those you should be all set. Now whenever your package is built on GitHub it should be automatically deployed on your server. You can always manually deploy by going to the url (http://server_ip_address:9000/hooks/deploy_Project_name)
March 8, 2022
Share this post if you enjoyed it :)
Subscribe to my newsletter to get notified of new posts
Follow Me On Twitter